A Different Way to Setup
Whether you’re using a ZimaOS device for personal or professional purposes, understanding how to connect to it through various networks is essential. This guide will cover three main types of network connections: direct connection, Local Area Network (LAN), and Wide Area Network (WAN). Each method has unique benefits and applications, ensuring you can access and manage your data seamlessly, whether you’re at home or on the go.
This article is for understanding connections under different networks.
Direct Connection

Direct connections are ideal for quick and straightforward setups, offering a fast and secure way to link devices without needing a broader network. This method is perfect for file transfers or using specific applications that require high-speed access.
Tips:If you encounter any problems during using Thounderbolt , you can get more detailed information here
What You Need:
Network cable or Thunderbolt cable for high-speed connections
ZimaOS device (ZimaCube Pro is Thunderbolt equipped) and client device (laptop, desktop PC, etc.)
Steps:
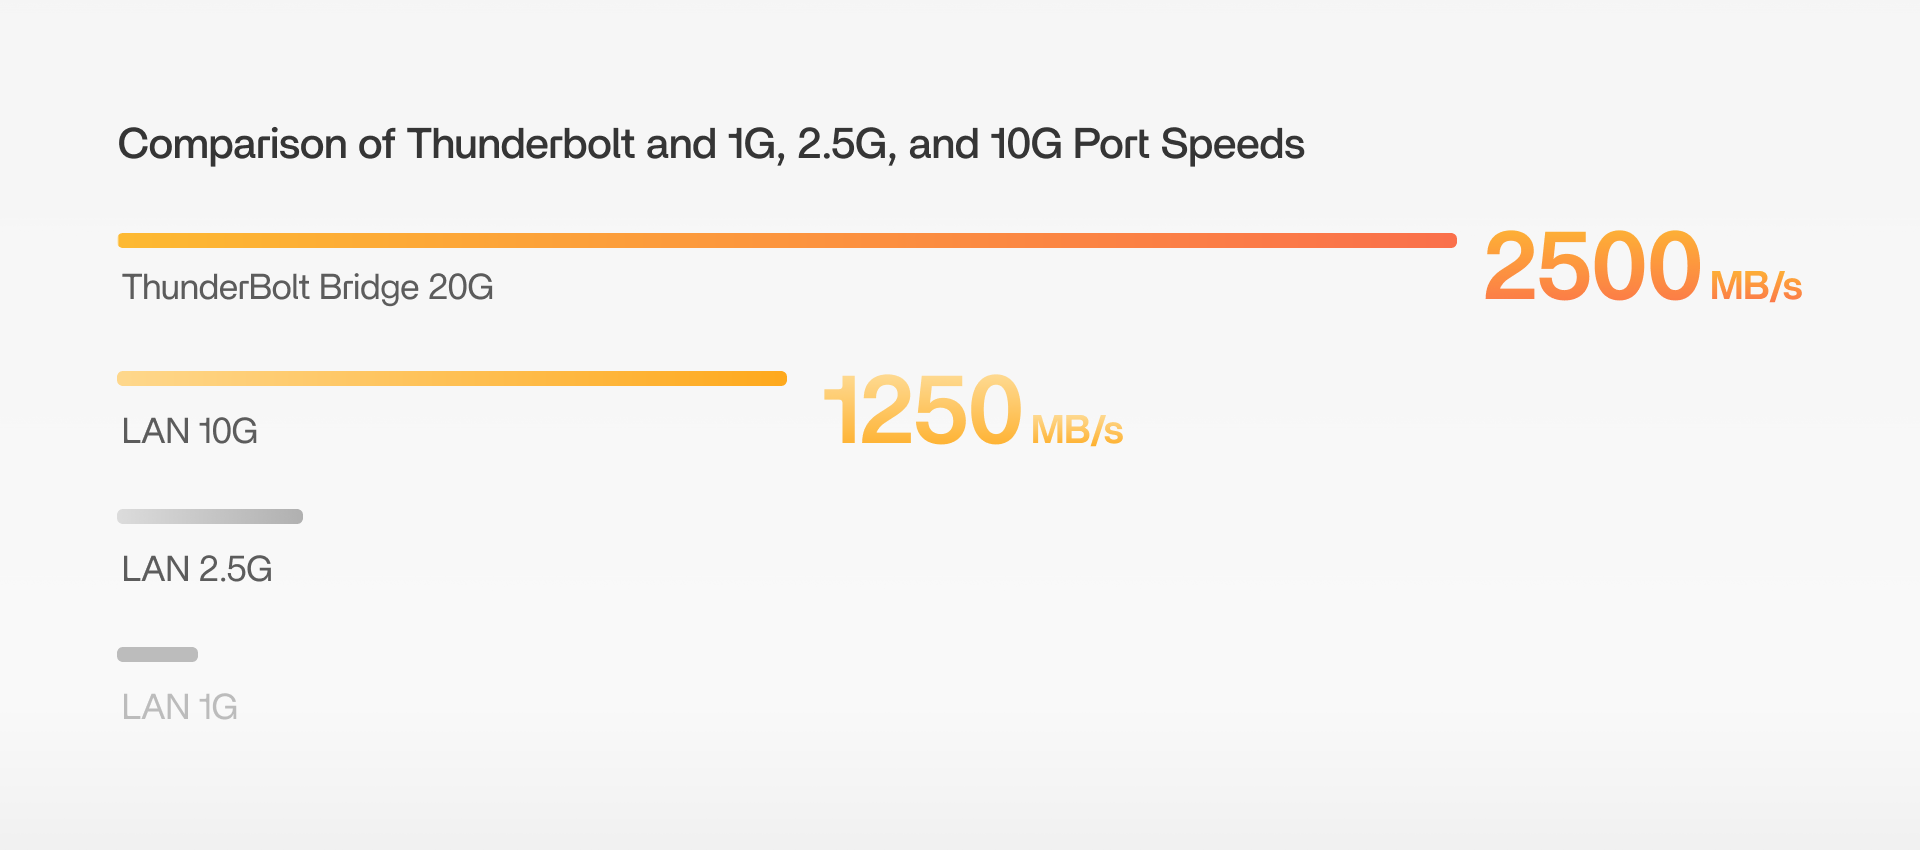
Establish the Connection: Use a standard network cable to connect your client device to ZimaOS device directly or utilize the Thunderbolt(for ZimaCube Pro users) cable for speeds up to 20G, ideal for demanding tasks.
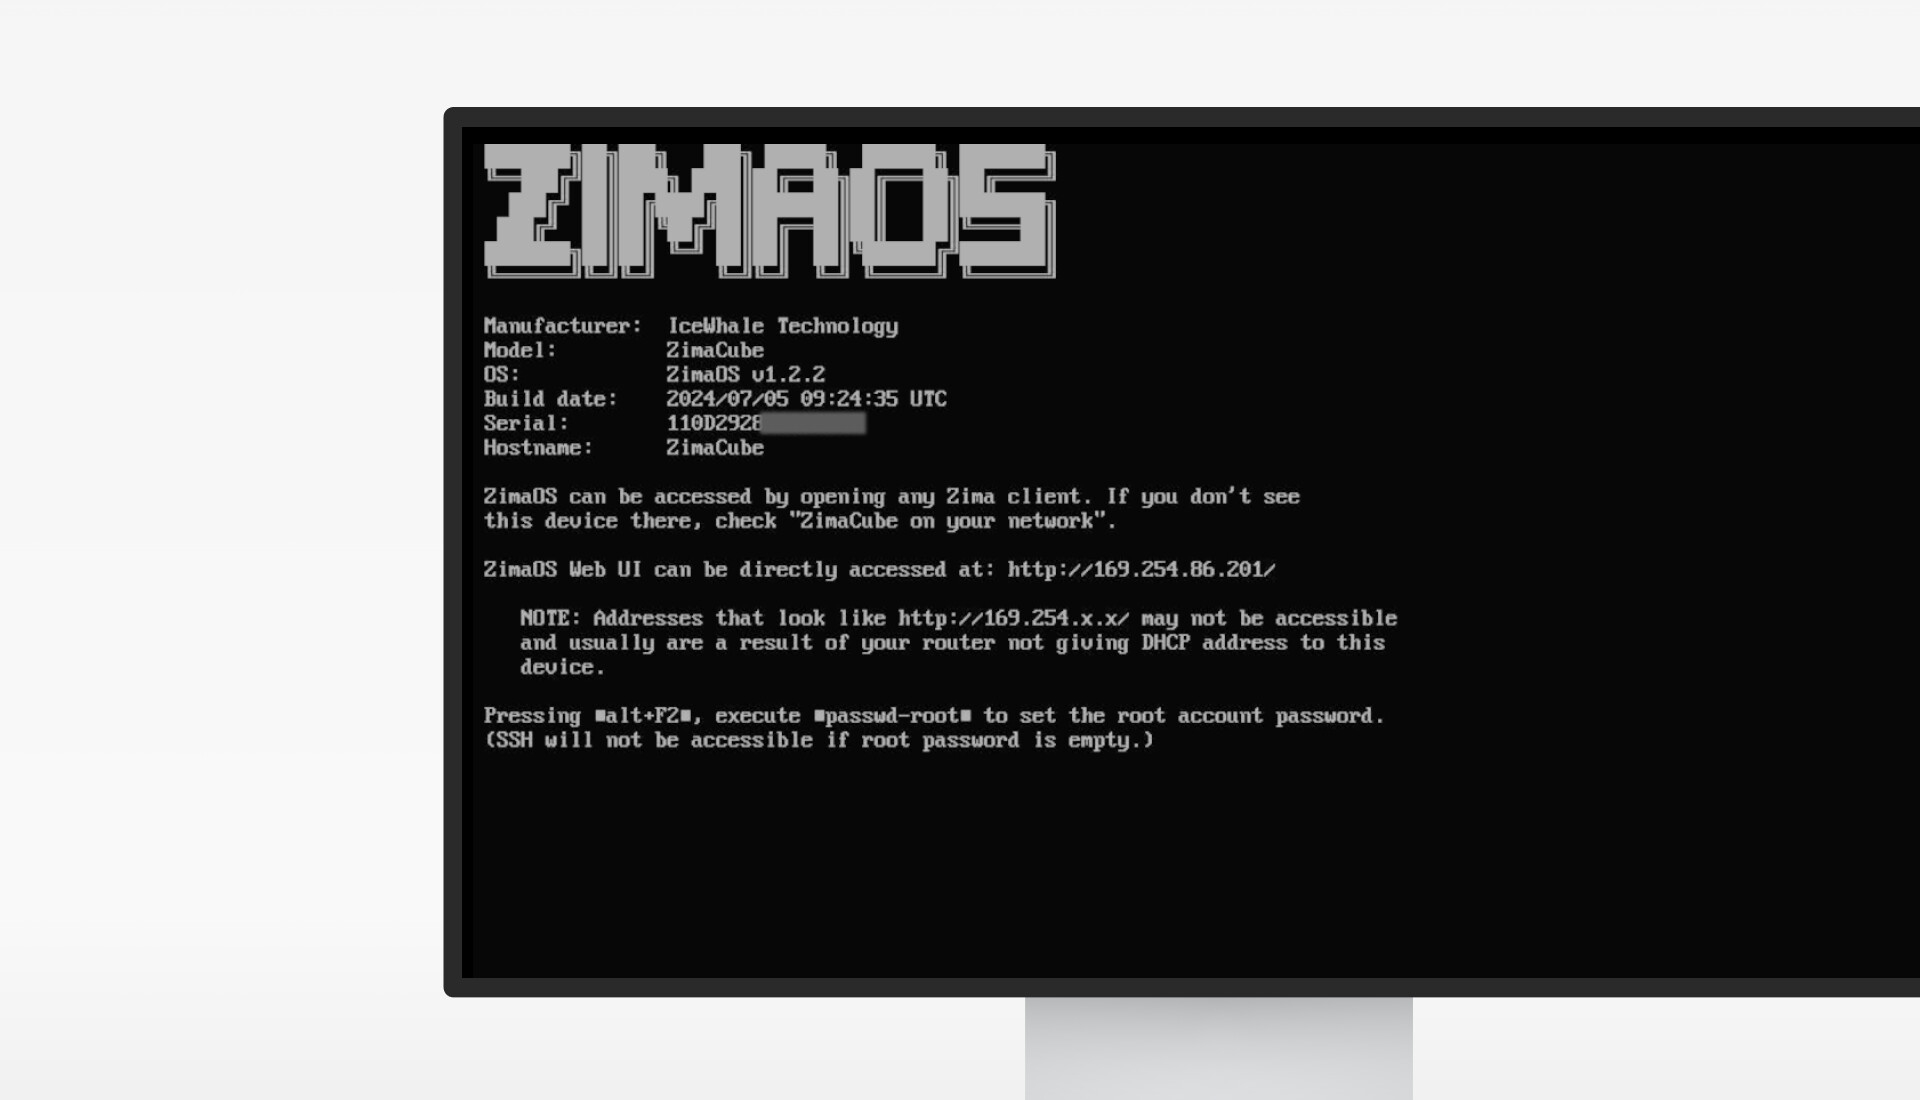
Network Configuration: IP is assigned through auto-configuration features. And it will be like 169.254.x.x.
This Means Your Successful Connection: An IP like 169.254.x.x shown on screen indicates a direct connection success.
Application Example and Use Cases: Take advantage of the high-speed connection, particularly useful for video editing or other bandwidth-intensive tasks. It is ideal for scenarios where low-latency and high-speed data transfer are crucial.
Local Area Network (LAN) Connection
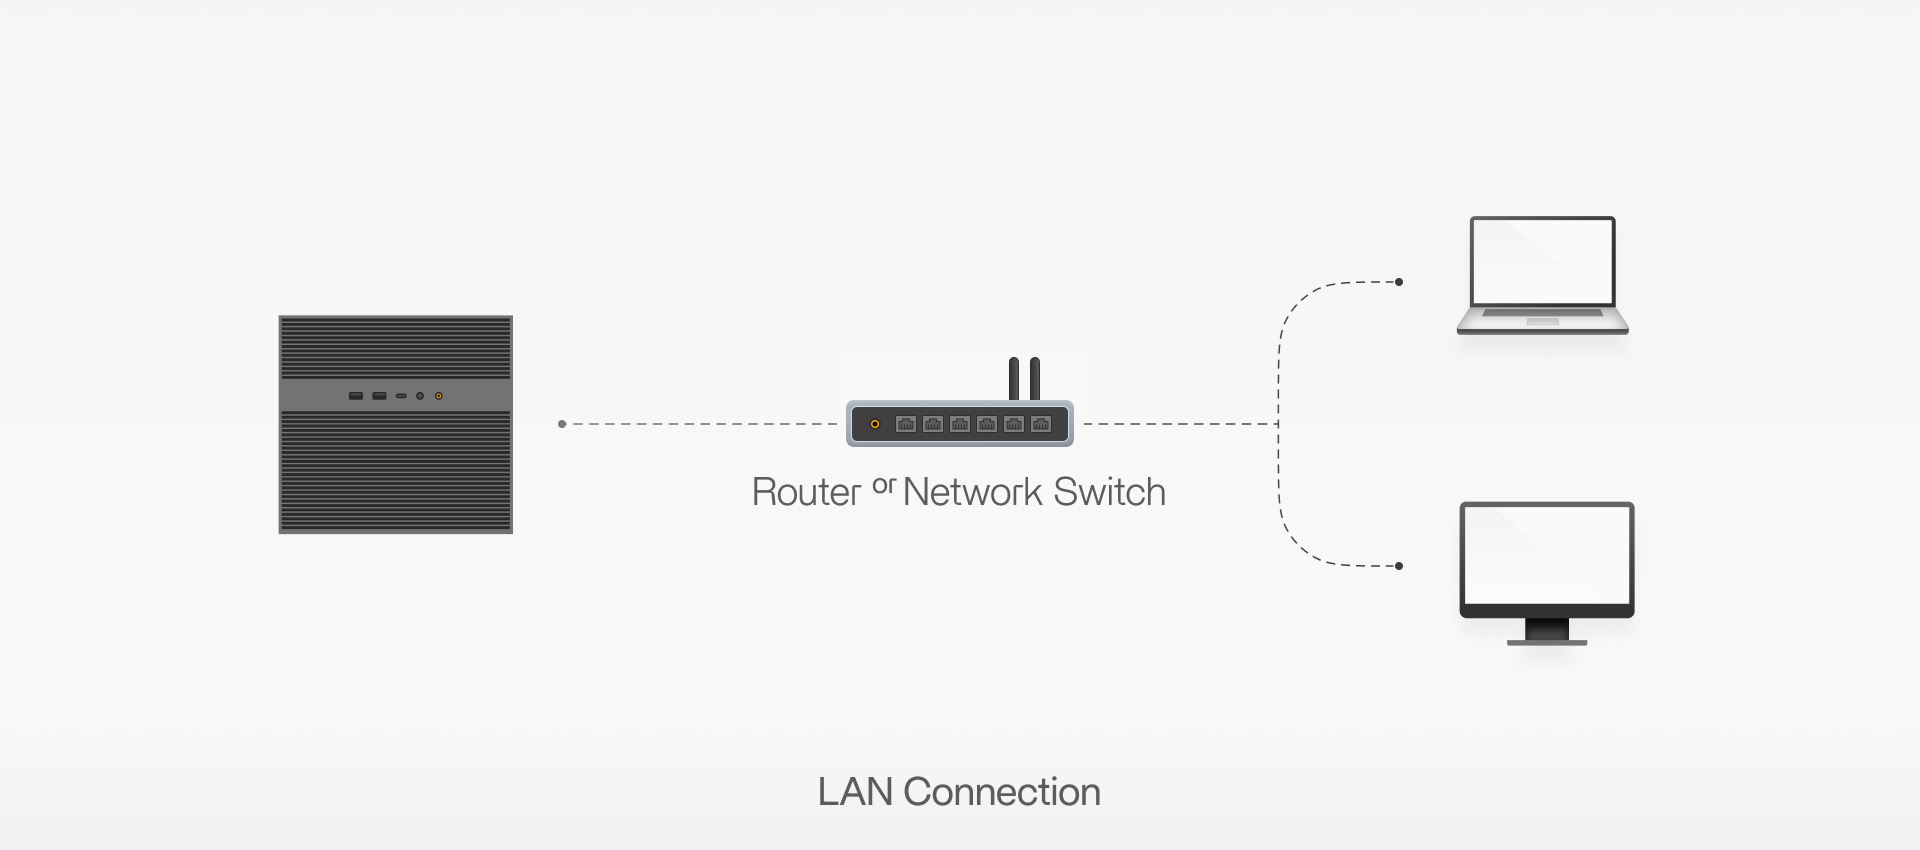
Connecting your ZimaOS devices via a LAN provides a robust and stable network environment, perfect for households or small businesses where multiple devices need to share resources efficiently.
What You Need:
Router or network switch
ZimaOS device (ZimaCube Pro is 10G NIC equipped) and client device (phone, laptop, desktop PC, etc.)
Steps:
Connect to the Network: Connect your ZimaOS device and other client devices to the router or switch.
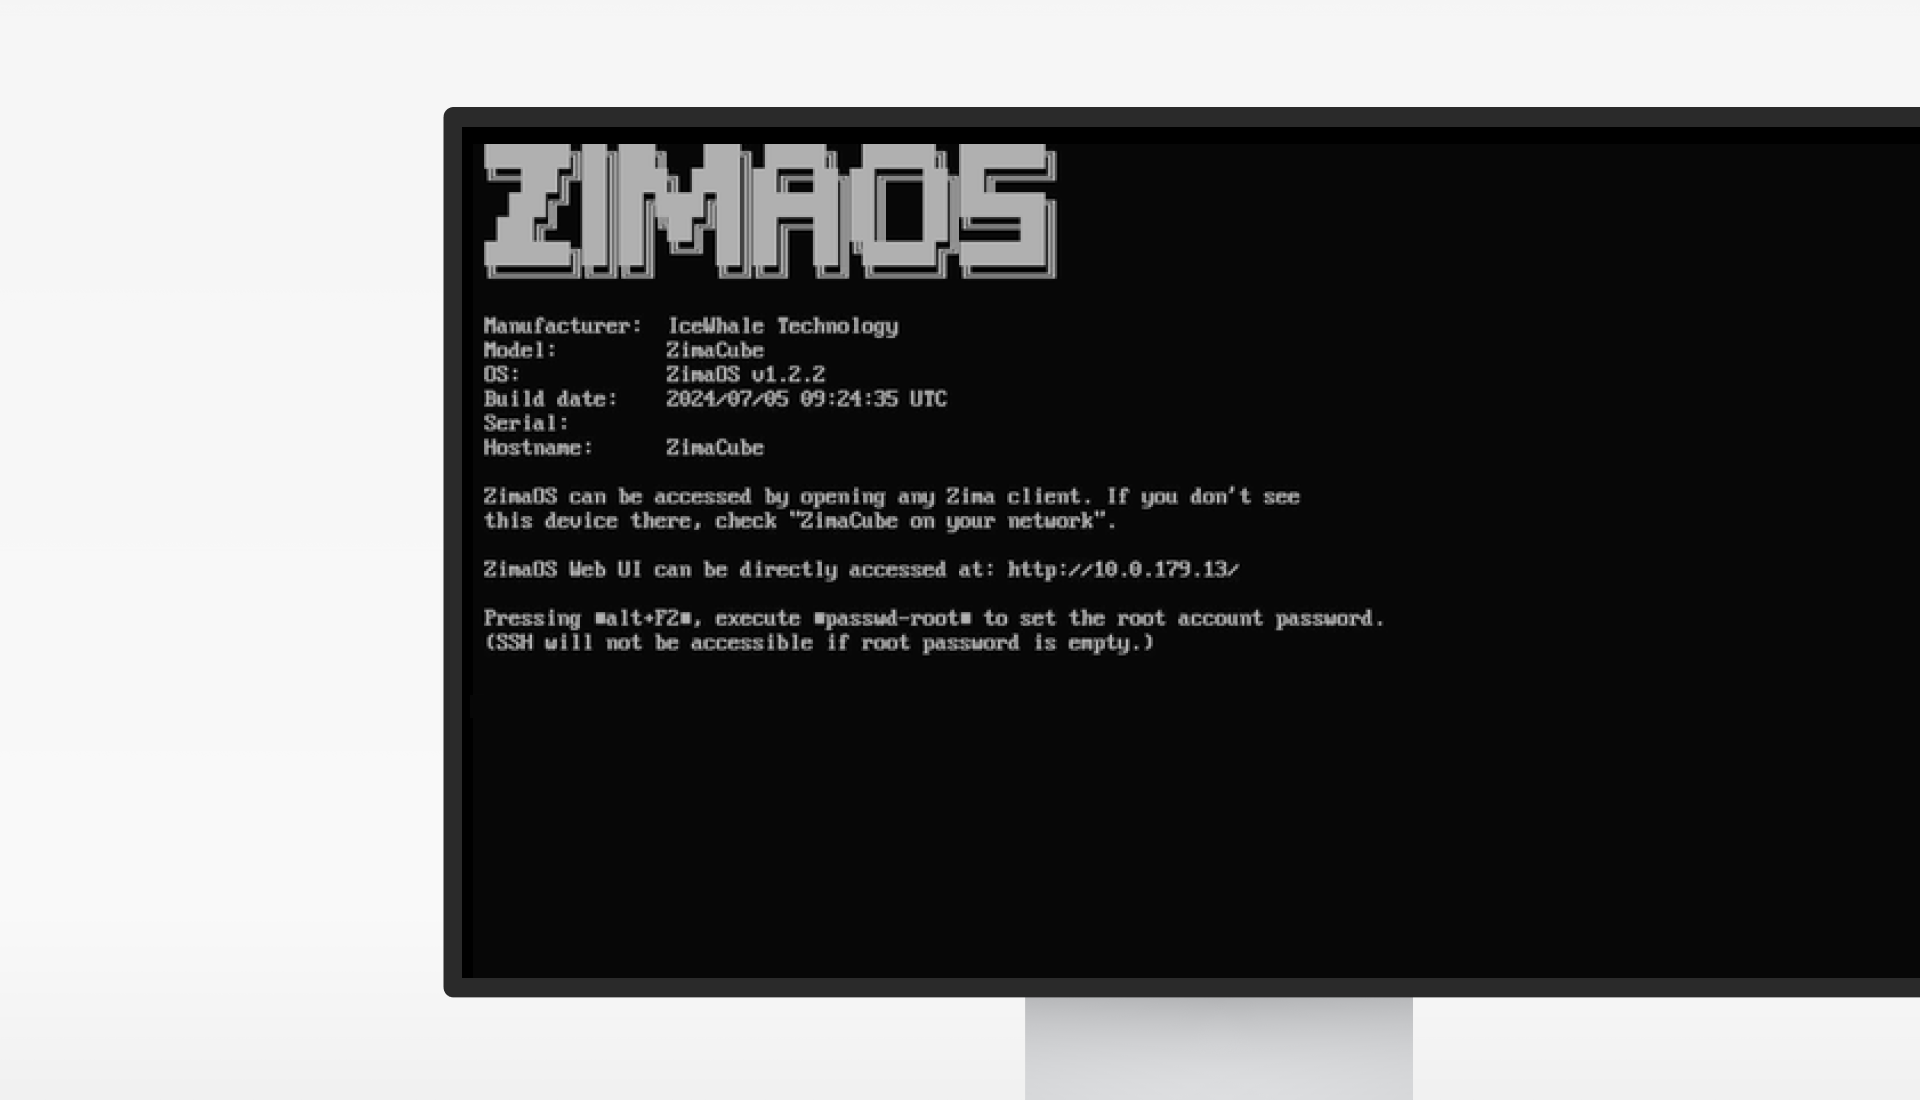
Network Configuration: Check that all devices are on the same subnet and can communicate with each other. It will be something like 192.168.x.x or 10.0.x.x, depending on your LAN configuration. You can manually assign static IP addresses for consistent device identification, or rely on DHCP for automatic assignment.
This Means Your Success Connection: An IP like 192.168.x.x shown on screen indicates a LAN connection success. The LAN IP depends on your LAN configuration.
Application Example and Use Cases: Stream and manage media content across devices, enjoying seamless access to your library. Best for environments needing reliable and fast local network access, such as media servers or shared file storage.
Which one will be chosen?
When you both have a direct connection and a LAN connection, which one will be chosen?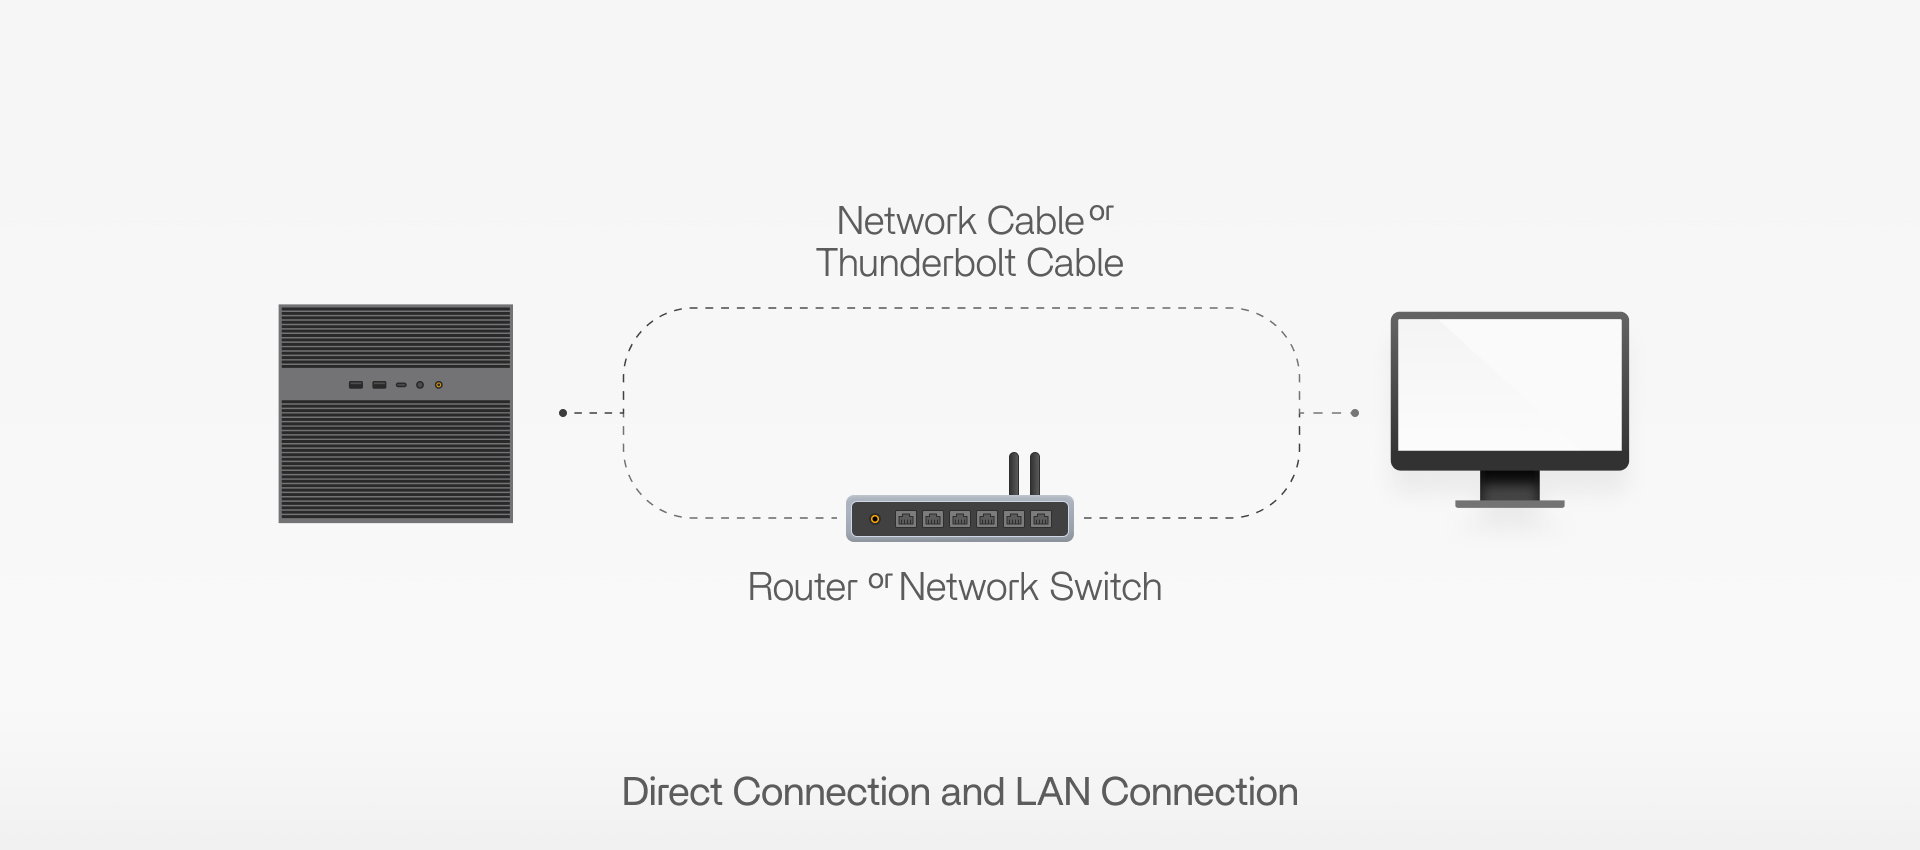
If you have read our tutorial 4 about SAMBA, an important way to experience NAS, you will probably master the right way to mount your NAS drive to your client device. The point is, there are two rules here to be noted:
Thunderbolt is preferred when you use the Zima app.
You can choose the specific connection by manually mounting folders through the corresponding IP.
Wide Area Network (WAN) Connection
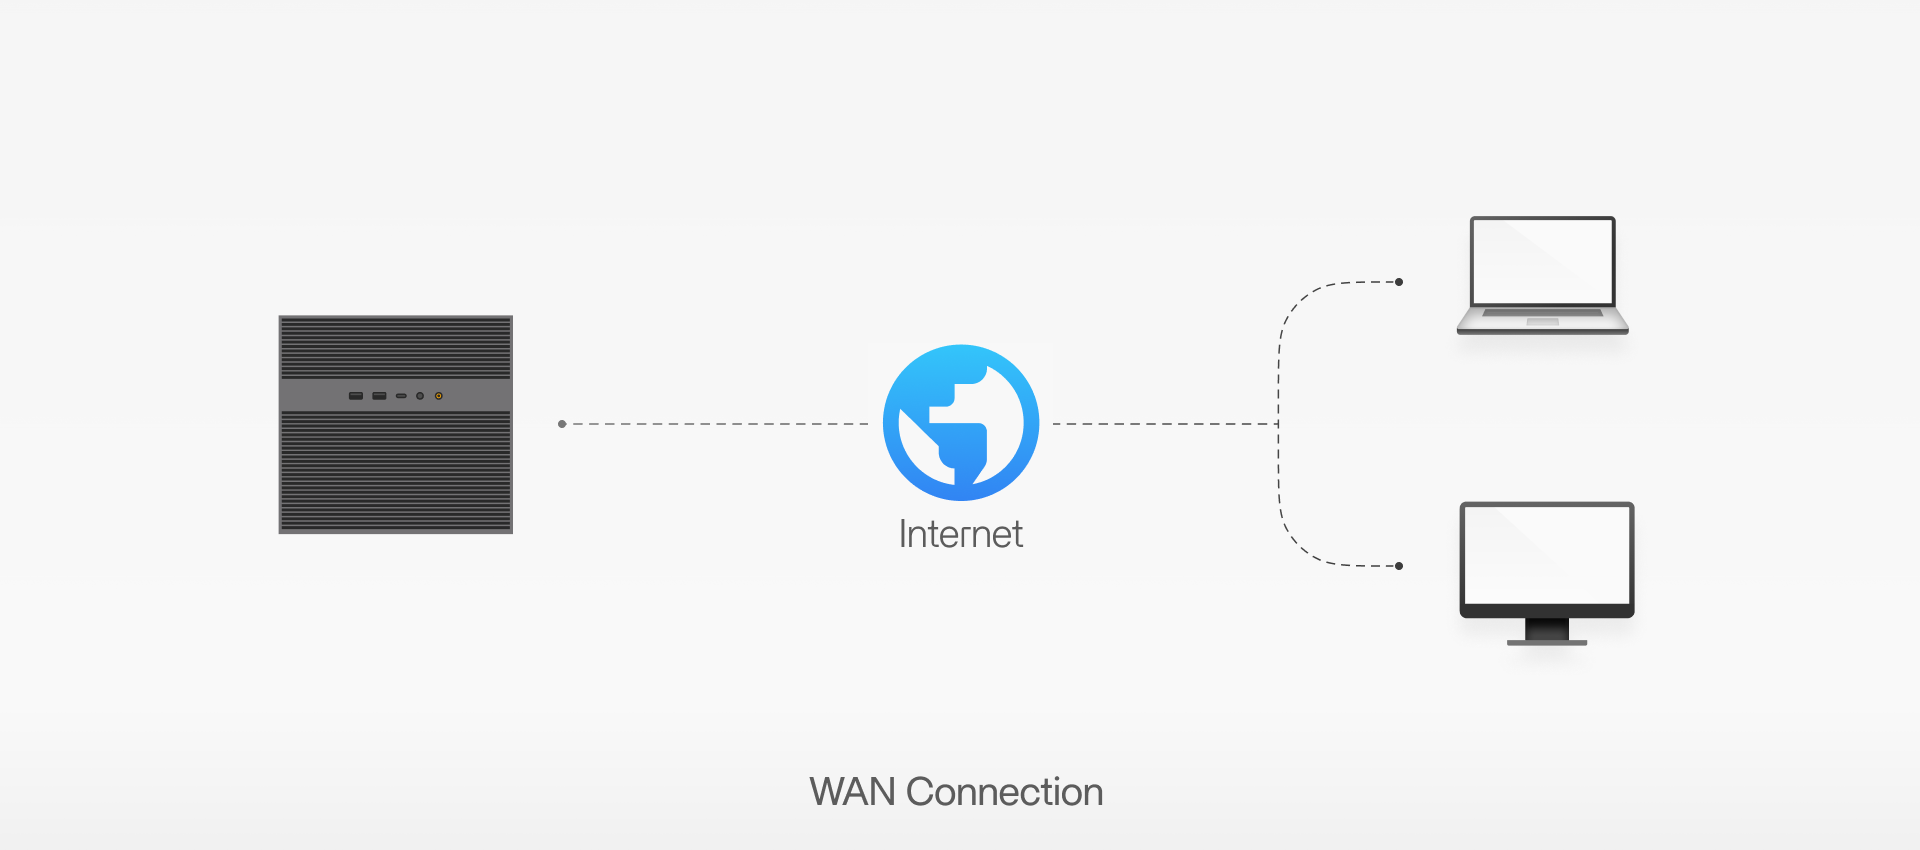
WAN connections enable remote access to your ZimaOS devices, allowing you to connect from anywhere with the Internet connection. This is particularly useful for remote work or accessing personal data while traveling.
For enhanced security and ease of access, we use Zerotier to create a virtual network, simplifying the connection process.
What You Need:
Internet connection for each device
Obtain the ZimaOS device Remote Login ID. This ID is a Zerotier ID, which you can obtain from ZimaOS dashboard → Network → Remote Login.
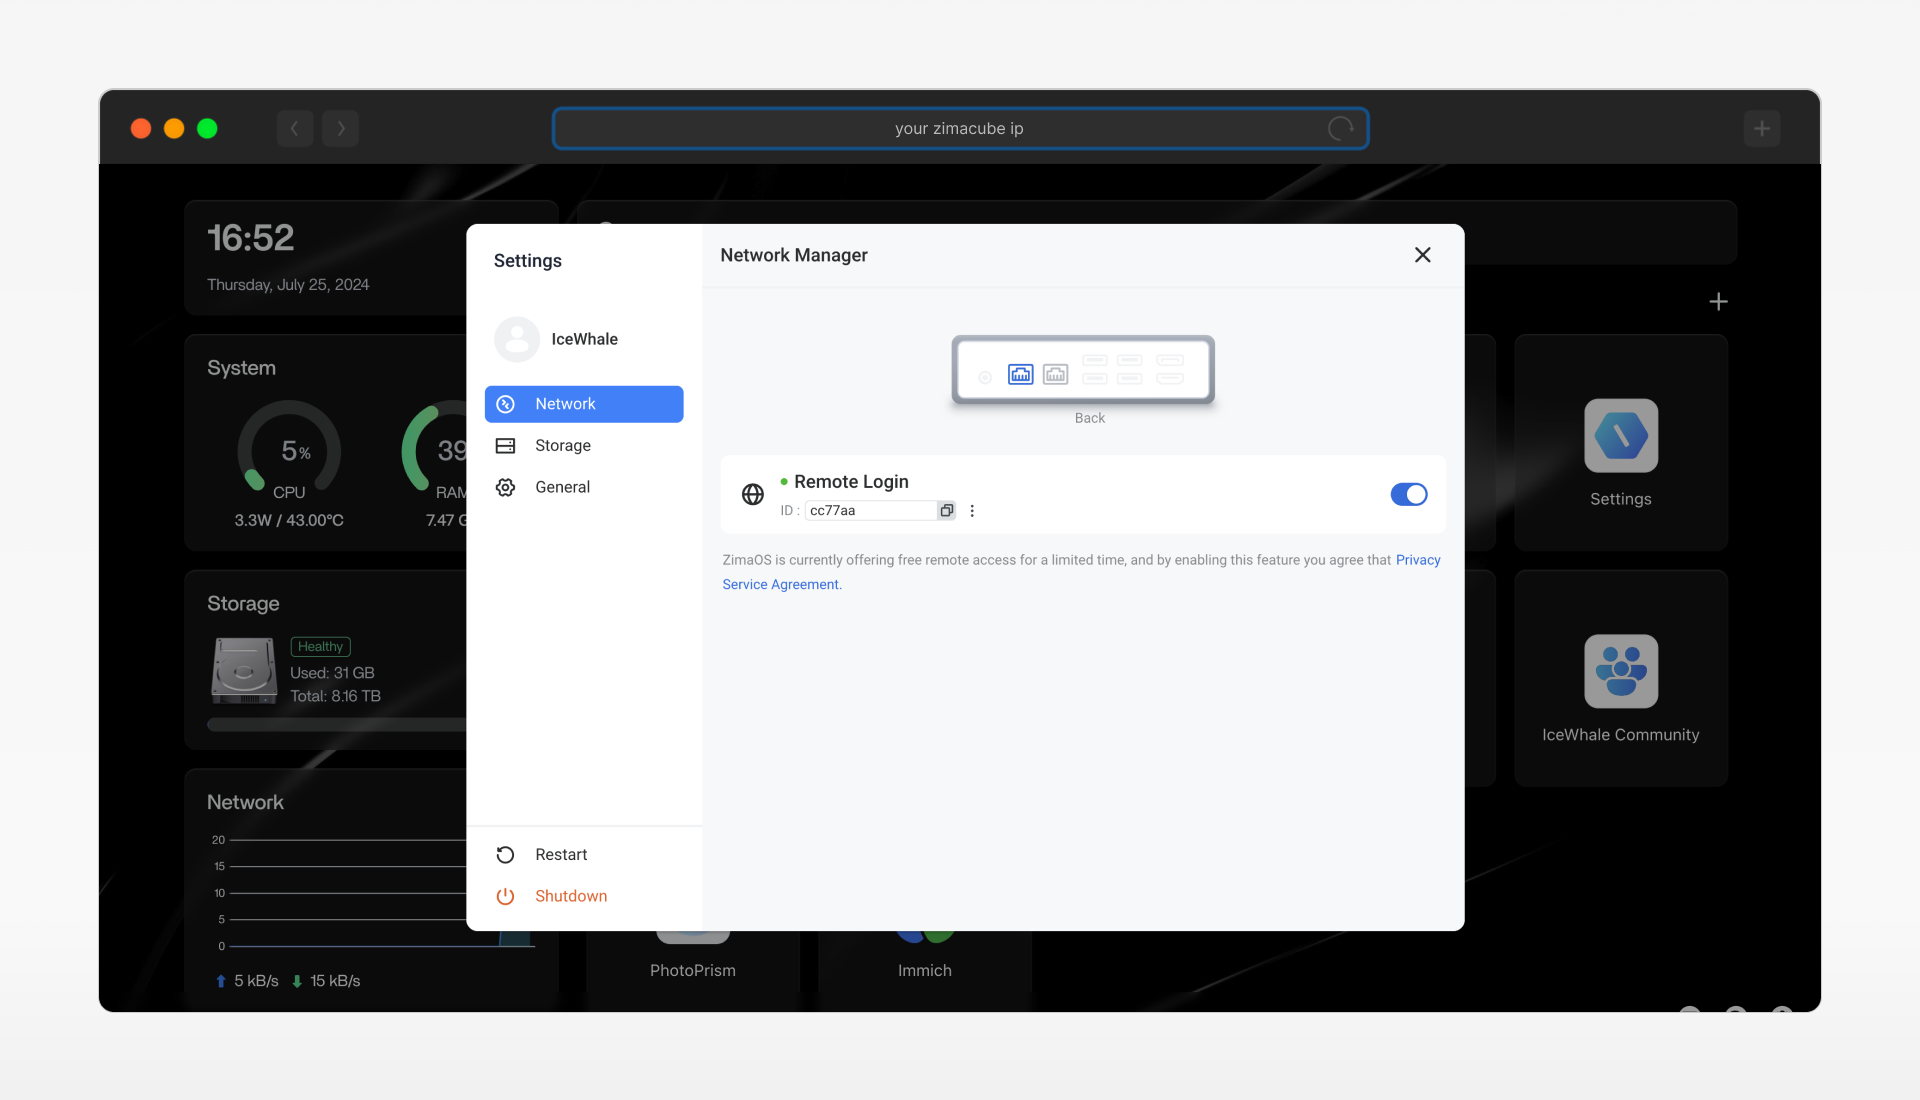
For your Windows/Mac, a Zima APP 5 (Zerotier integrated) is needed.
Steps:
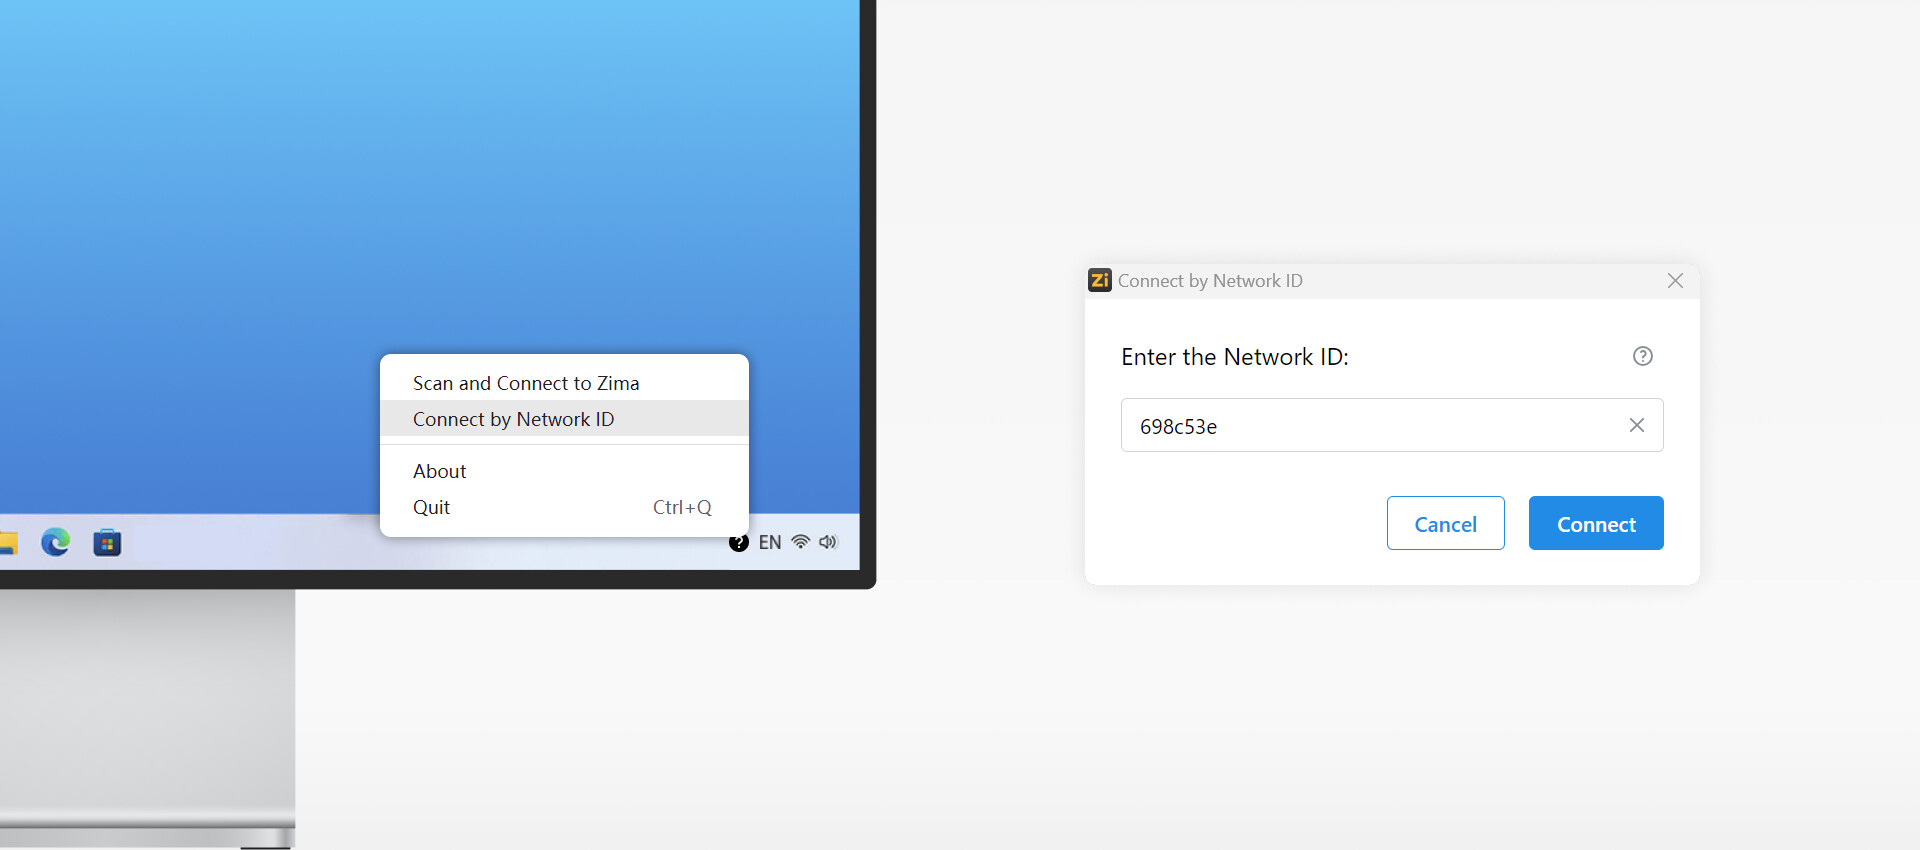
Establish the Connection: Download and launch the zima app on your Windows/Mac. Click the app icon to the right of the system taskbar and select Connect by Network ID. After that, you may need to input your WebUI’s username and password.
Network Configuration: Basically, you don’t need any further network configuration since Zima app has done these for you.
**This Means Your Success Connection: **You will be navigated to ZimaOS’ dashboard.
Application Example and Use Cases: Use WAN connections to securely access critical files or manage devices in emergencies. It is ideal for users needing to manage or access their ZimaOS devices remotely, ensuring continuous availability of important data.
Optional: Public IP address with a dynamic DNS configured would be an option, since you can access your device through a domain name directly.
Conclusion
No matter your needs, ZimaOS provides flexible and powerful connectivity options to suit any situation. From high-speed direct connections to convenient remote access via WAN, you can manage your devices and data effortlessly. Always consider security measures, especially when dealing with WAN connections, to protect your information and maintain smooth operations.
If you encounter any issues during use, feel free to let us know at any time. You can also join our community and Discord to discuss more about ZimaCube and ZimaOS. We look forward to your feedback!