Welcome to Zima Space! This guide is designed for anyone using ZimaCube for the first time, guiding you through three simple steps to access the system. Whether you’re tech-savvy or not, we’ll patiently help you get started with ease and enjoy the convenience of our storage solution.
Unbox-ing
Shipping list
What is in the Box
In addition to the device itself, we have prepared all the necessary accessories for you to get started quickly, you should find the following items included: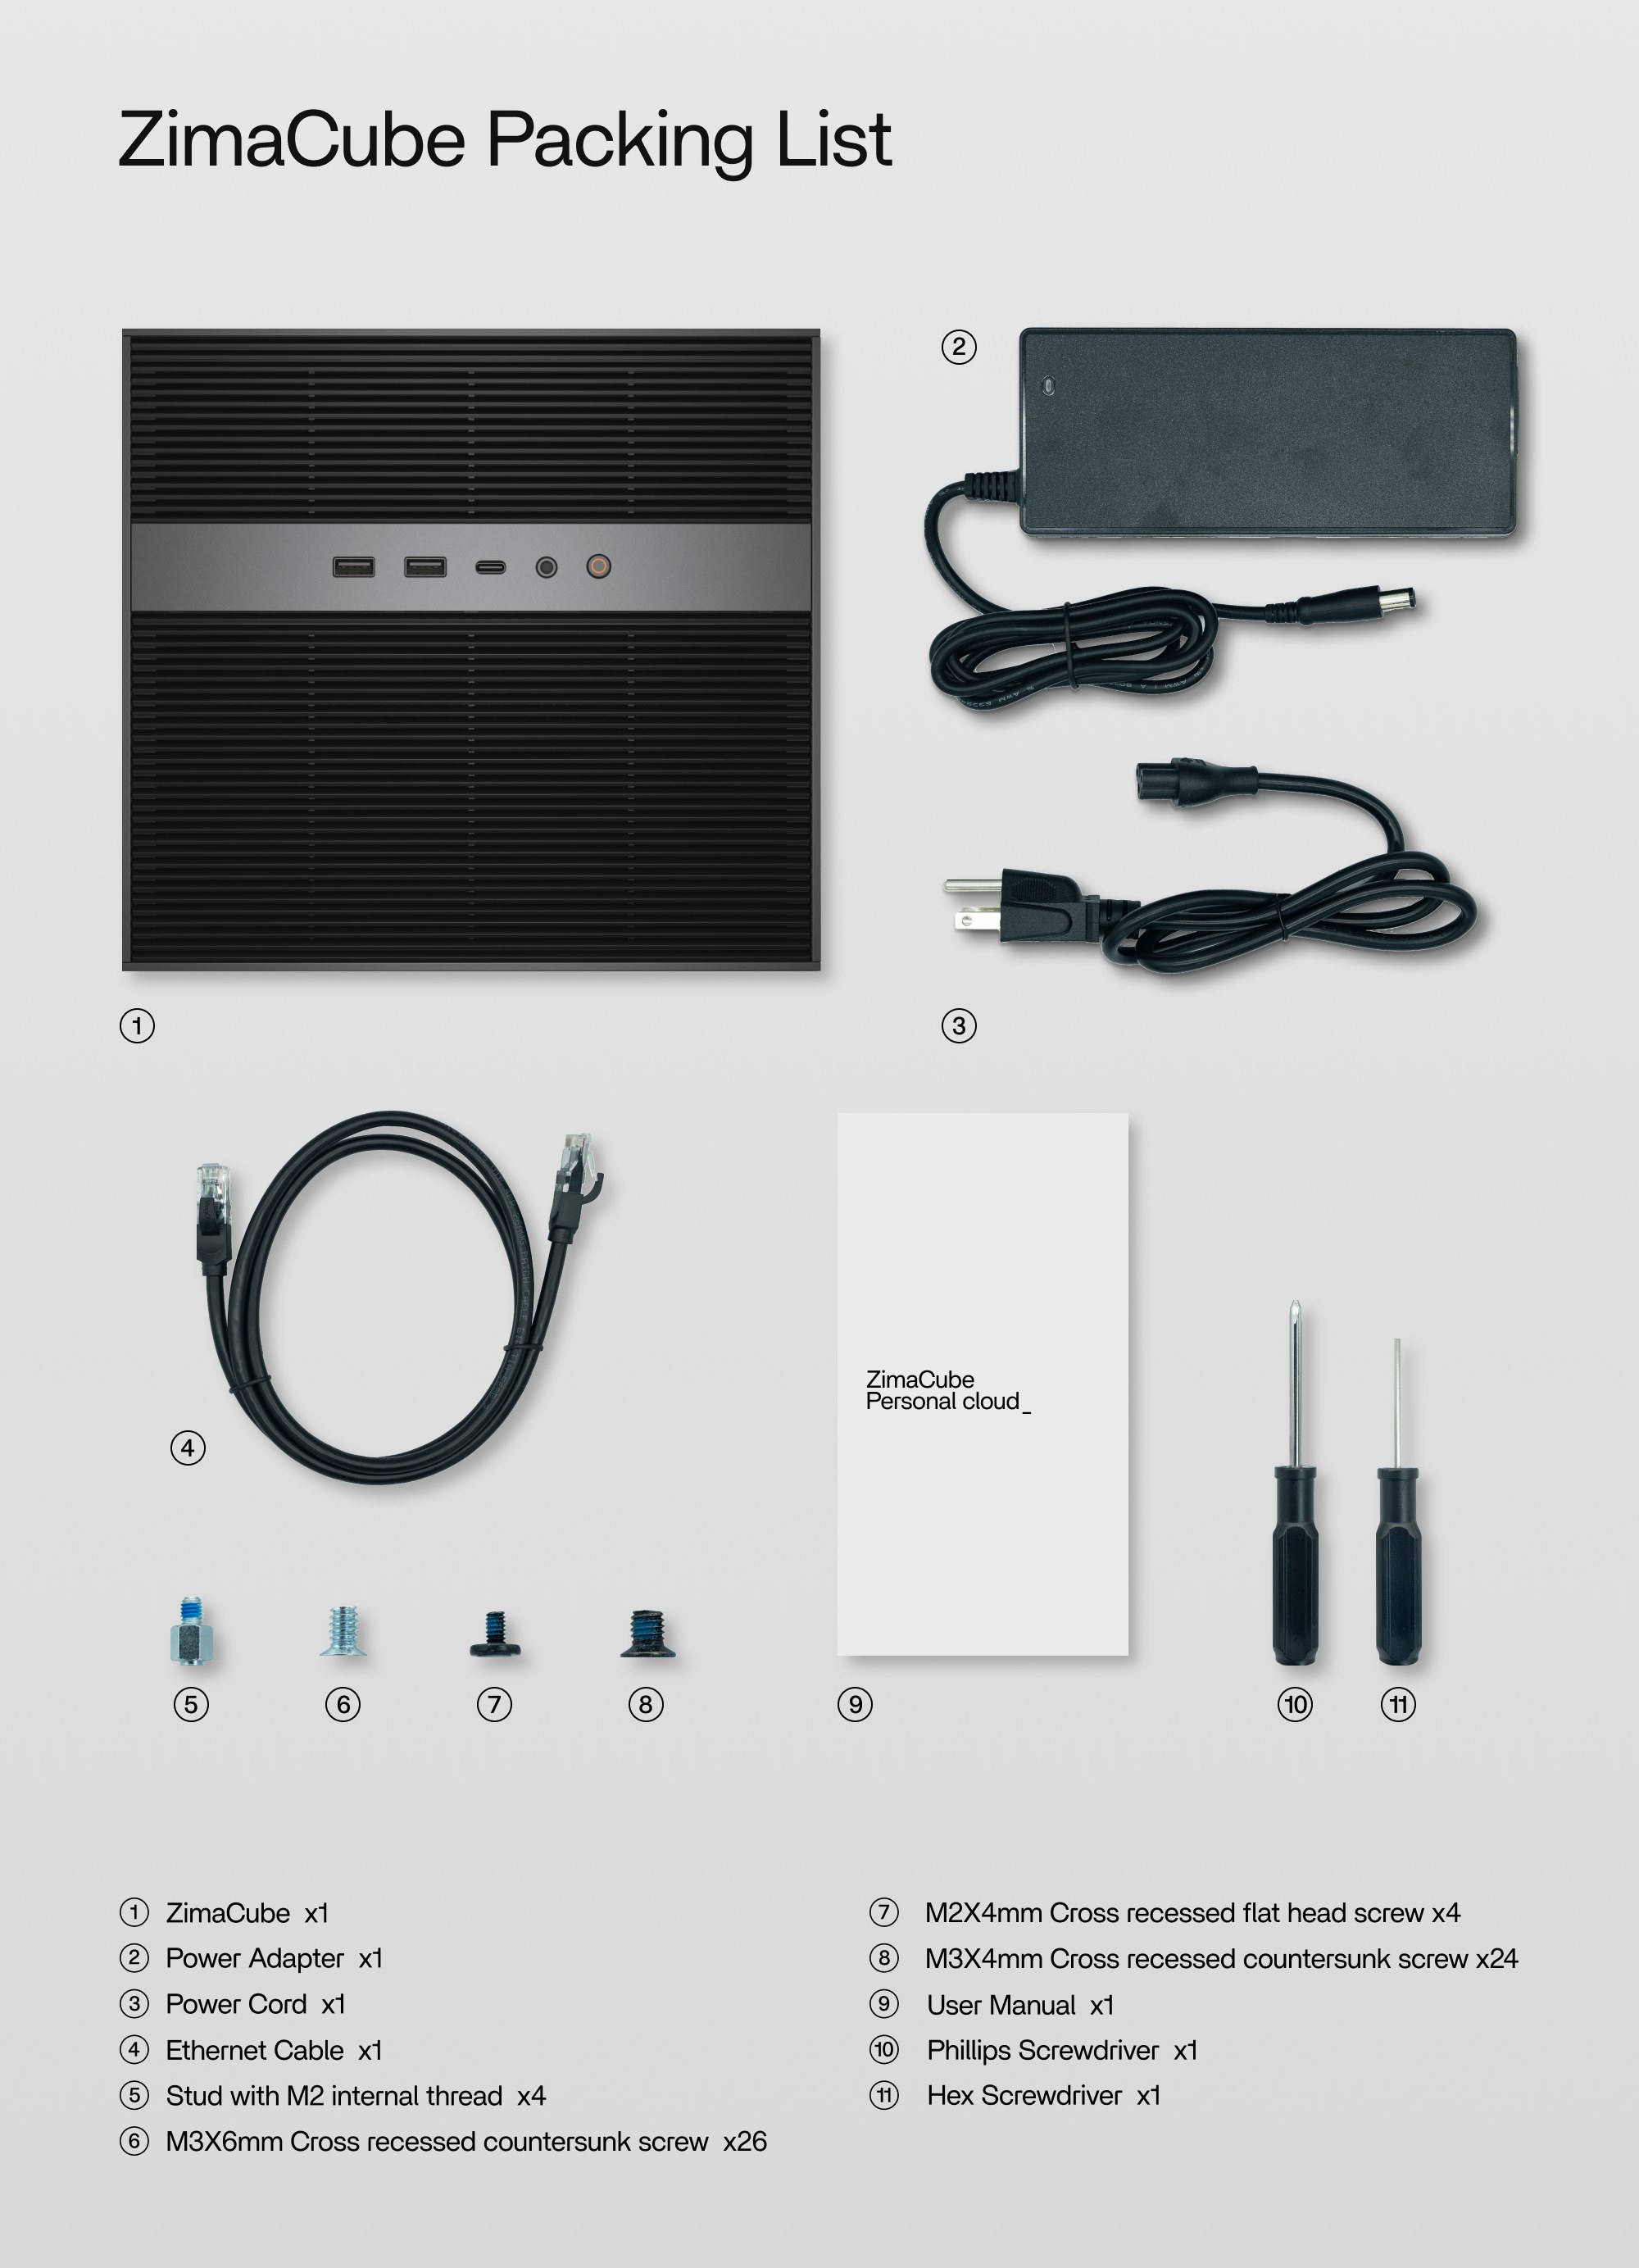
Product Overview
Before we get started, let’s take a moment to get to know this unit.
ZimaCube is a high-performance NAS device, featuring not only standard interfaces but also a variety of high-speed connections designed to meet your diverse needs.
Let’s begin by briefly exploring the functions of these different interfaces.
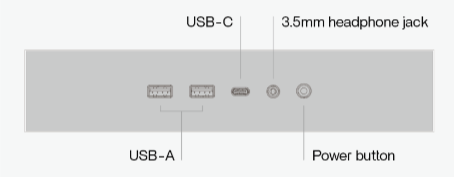
Front Interface Panel
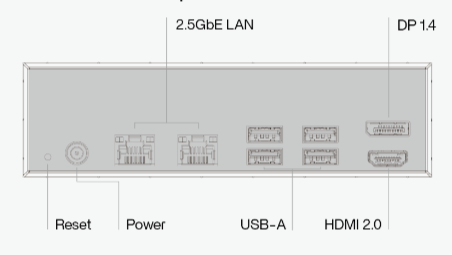
Rear Interface Panel for ZimaCube
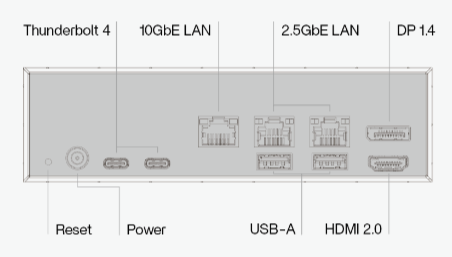
Rear Interface Panel for ZimaCube Pro
Accessories Overview
Each accessory is designed to serve a specific purpose, ensuring the smooth setup and optimal use of your ZimaCube.
- Power Adapter and Cord : Ensure your ZimaCube, hard drives, and accessories receive adequate power for optimal performance.
- Ethernet Cable: Used to connect the ZimaCube to your network.
- Screws of Various Types:
- Stud with M2 internal thread: Used to elevate and secure the 7th SSD.
- M2X4mm Cross recessed flat head screw:Used to fasten the 7th SSD.
- M3X6mm Cross recessed countersunk screw:Used to fasten 3.5-inch hard disk.
- M3X4mm Cross recessed countersunk screw:Used to fasten 2.5-inch hard disk.
Setup HDD
Before powering on, let’s take another look at how to install your accessories. For instance, your disk, the most crucial component of a NAS.
Unlock the device
- Remove the the front panel
Begin by carefully detaching the front panel of the ZimaCube chassis to access the internal components.
TipsThe front panel is attached with magnets. To remove it, simply press the corners to lift it up.
3. press the button to unlock the handle
Locate and press the yellow button situated on the hard drive bay. This will release the locking mechanism of the hard drive tray.
4. pull out the tray
Once the hard drive tray handle pops out, gently pull it to slowly slide the hard drive tray out of the bay.
Install SATA Disk
Install 3.5 hard disk
- Prepare the Hard Drive Tray:
- Remove the hard drive tray and prepare.
- Insert the 3.5-inch Hard Drive:
- Place the 3.5-inch hard drive into the tray, aligning the screw holes on the sides of the hard drive with those on the tray.
- Secure the Hard Drive:
- Use the provided 6-32 screws to secure the hard drive in place. It is recommended to use the screws that come with your ZimaCube for a proper fit.
- Ensure the screws are tightened so that the surface is flush and even.
Install 2.5 hard disk
- Prepare the Hard Drive Tray:
- Remove the hard drive tray and prepare.
- Insert the 3.5-inch hard drive:
- Place the 3.5-inch hard drive into the tray, aligning the screw holes on the sides of the hard drive with those on the tray.
- Secure the Hard Drive:
- Use the provided M3 screws to secure the hard drive in place. It is recommended to use the screws that come with your ZimaCube for a proper fit.
- Ensure the screws are tightened so that the surface is flush and even.
Install M.2 Disk
How to install an M.2 drive
- Prepare the 7th Bay:
Remove the 7th Bay and prepare. - Insert the M.2 SSD:
- Align the M.2 interface and gently slide the M.2 SSD into the slot at a 30 to 45 degree angle, then push it down flat.
- (You’ll know it’s in correctly when it clicks into place. Don’t force it; if it doesn’t go in easily, ensure to recheck and adjust the alignment accordingly.)
- Secure the M.2 SSD:
- Use the appropriate screw to secure the SSD in place.
Connect Power Adapter
Next, start the device.
Connect power and network cables
Power port and network cable
- Power connection, make sure you are using the correct power adapter that came with the ZimaCube.
- Locate the power port: Power Port Model: DC 7.4 x 5.0 mm
- Plug the power adapter plug into the power port on the ZimaCube.
- Network Connection
ZimaCube is equipped with multiple network ports, including 10GbE (Gigabit Ethernet) port and 2.5GbE (Gigabit Ethernet) port. The 10GbE port is designed for high-speed network connection, while the 2.5GbE port provides standard network functions.
- Network port model: ZimaCube: Intel i226 2.5GbE x2
ZimaCube Pro: Intel i226 2.5GbE x2; AQC113 10GbE x1 - Connect Ethernet cable: Select the appropriate Ethernet port according to your network setup and requirements.
- Plug one end of the Ethernet cable into the selected network port on ZimaCube.
- Connect the other end of the Ethernet cable to a router, switch, or network socket.
Click Power Button
Press the power button on the front panel, and you will see the power indicator light up. Additionally, the LED for the 7th Bay will start displaying a soft,breathing light effect.
Log-in
Find out your ZimaCube
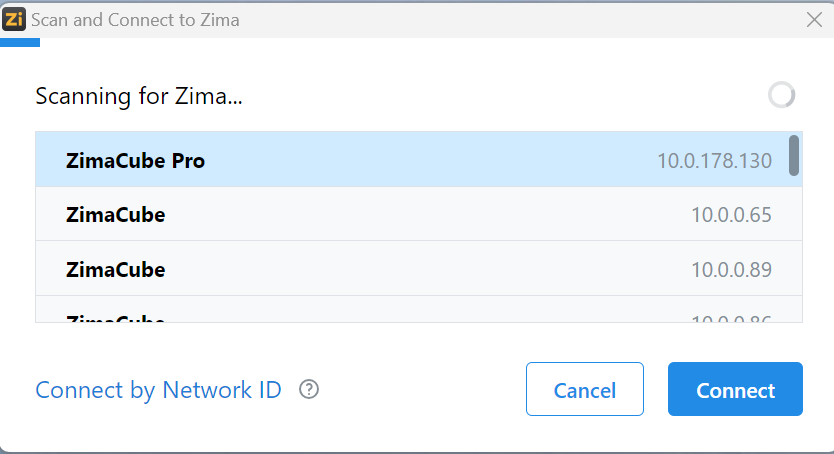
1.Connect via Findzima
- Go to https://find.zimaspace.com/, download and install the ZimaClient software. You can choose MacOS or Windows according to your connection device.

- After downloading and installing ZimaClient. It will automatically scan for available devices. Follow the instructions to complete the next steps.
Note: Make sure the connected device is under the same network as ZimaCube. - When you log in for the first time, you can find your device on the connection interface and connect.
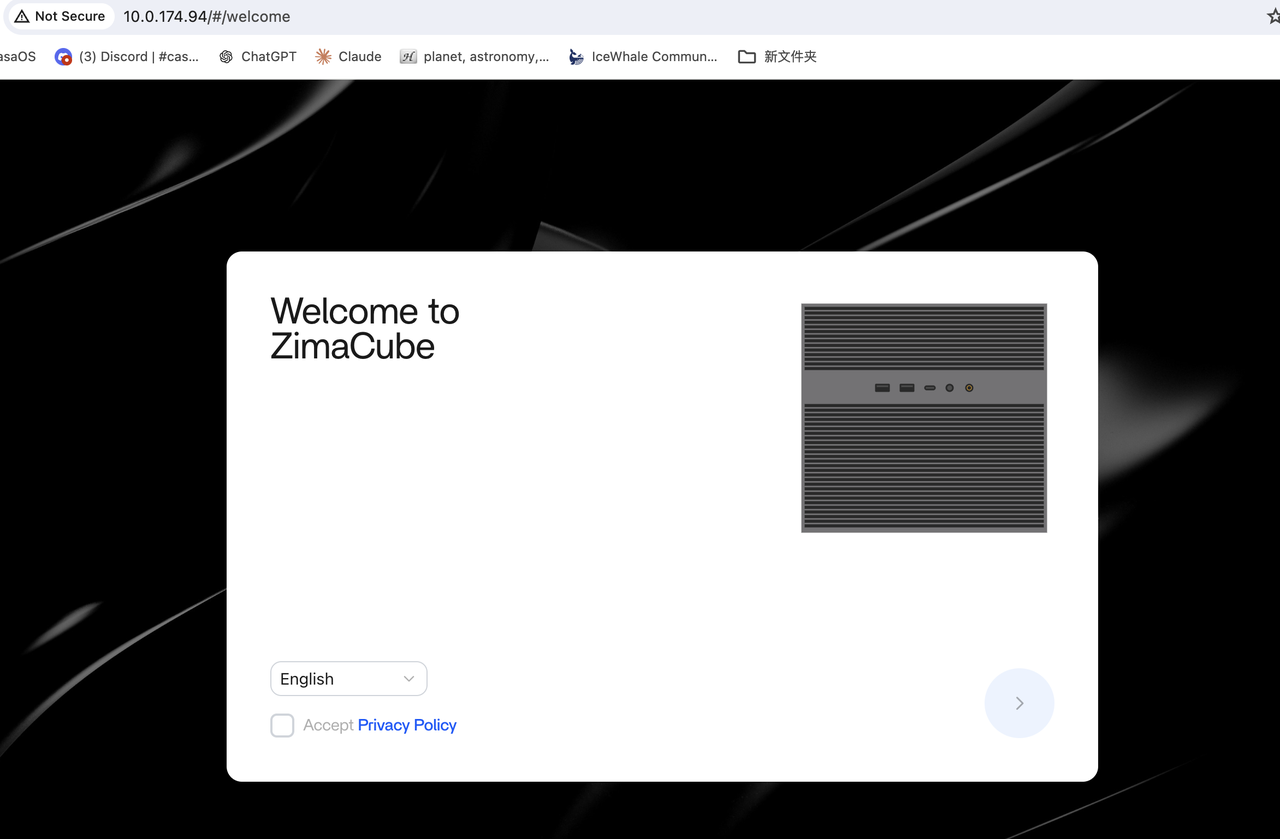
Here We Go!
Welcome to ZimaOS
With these three simple steps, you’re now ready to start using your ZimaCube and exploring all the features it offers. We hope this guide has made the setup process smooth and straightforward, allowing you to fully enjoy the convenience and power of your ZimaCube.
If you have any further questions or need additional support, our team is always here to help.